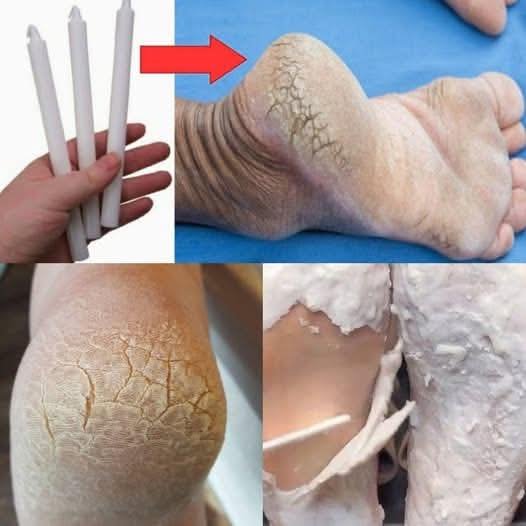
Say Goodbye to Dry, Cracked Heels with This Candle Wax Remedy
If you’ve been battling dry, cracked heels, you know how frustrating it can be to find a solution that works. Traditional moisturizers sometimes don’t seem to cut it, and pedicures can be expensive. But there’s a surprisingly simple remedy that many swear by—candle wax!
Yes, you heard that right. Candle wax, specifically the type used in paraffin wax treatments, can actually work wonders in healing dry, cracked heels. The idea behind this treatment is to use the wax to deeply hydrate the skin, lock in moisture, and provide a barrier that helps prevent further cracking. Here’s a detailed breakdown of how to do it and why it works:
What You Need:
-
Candle Wax (preferably paraffin wax or a high-quality candle wax that’s safe for skin use)
-
A small bowl or container to melt the wax
-
A towel or foot cover (to protect your surface)
-
Moisturizing lotion or foot cream (optional, but helps enhance the effect)
-
A small pot for heating the wax (or a microwave-safe container)
-
A foot scrub (optional, for prepping your feet before the treatment)
-
A plastic bag or cling film (for wrapping your feet afterward, optional but helpful)
Step-by-Step Guide:
-
Prepare Your Feet:
Before you start, it’s a good idea to prep your feet by soaking them in warm, soapy water for about 10-15 minutes. This will help soften the skin and remove any dirt or dead skin cells. If you want, you can use a foot scrub to exfoliate gently and remove the thickest layers of dead skin. -
Melt the Wax:
Place a few pieces of candle wax (preferably paraffin or beeswax, as they melt easily and are safe on the skin) into a small pot or microwave-safe container. Heat the wax slowly until it’s completely melted and smooth. If you’re using a microwave, do it in short intervals, stirring in between, so you don’t overheat it. -
Test the Temperature:
Before you begin applying the wax to your feet, make sure it’s not too hot. Dip a finger or a small portion of your skin in the melted wax to ensure it’s comfortable and safe to apply. It should feel warm, not scalding. -
Apply the Wax:
Dip your fingers or a brush into the melted wax and gently coat the heels (and any dry, cracked spots) with the warm wax. You can apply it generously over the areas that need extra attention. The wax should form a thin layer, but you don’t need to go overboard. You’re essentially creating a protective barrier to lock in moisture. -
Wrap Your Feet:
Once your heels are covered in wax, wrap your feet in a plastic bag or cling film to trap the warmth and allow the wax to penetrate deeper into the skin. This will help keep the wax in place and give it time to work its magic. If you don’t have a bag, you can also use a thick pair of socks to hold the wax on. -
Let It Sit:
Leave the wax on for about 15-20 minutes. During this time, the wax will begin to harden and form a protective layer around the skin. The warmth helps open your pores, allowing the wax to deeply hydrate and soften your heels. -
Remove the Wax:
After the time has passed, gently peel off the wax layer. The dead skin will often come off with it, leaving your heels feeling smoother and softer. If you notice any excess wax left on your skin, you can wash it off with warm water. -
Moisturize:
After you’ve removed the wax, apply a rich foot cream or moisturizer to seal in the hydration. You may notice your heels feeling softer immediately, but regular use will help continue the healing process over time.
Why Does This Work?
-
Moisture Locking: Candle wax, especially paraffin wax, creates a barrier over the skin that traps moisture and helps keep it from evaporating. The heat also opens up your pores, allowing your skin to absorb the moisture more effectively.
-
Exfoliation: As the wax hardens, it can help remove dead skin cells and slough off rough patches, leaving your feet feeling soft and smooth.
-
Relaxation: The heat from the wax can provide a soothing sensation, helping you relax while nourishing your skin.
-
Long-Term Benefits: While this treatment won’t necessarily eliminate the problem overnight, regular use can make a significant difference in the texture and appearance of your heels. You’ll likely notice smoother, less cracked skin after a few applications.
Tips for Best Results:
-
Do it Regularly: For severe cracks and dryness, it’s best to repeat this treatment 2-3 times a week until you see improvement.
-
Wear Socks Afterward: To maximize the moisturizing effect, consider wearing socks overnight after the treatment. This will help lock in moisture and further enhance the softness of your feet.
-
Hydrate Your Feet Daily: Even on days when you don’t do the wax treatment, apply a good foot cream to keep your heels moisturized and prevent cracks from forming again.
Caution:
-
If you have any allergies or skin sensitivities, do a patch test before applying wax to your heels.
-
If your cracks are deep or bleeding, consider seeing a doctor or dermatologist, as this may indicate a more serious skin condition that requires medical treatment.
By incorporating candle wax into your foot care routine, you can say goodbye to dry, cracked heels without the need for expensive treatments or harsh chemicals. It’s a natural, soothing remedy that not only addresses the immediate discomfort but also works to heal and protect your skin over time.